Shopify integration
Connect Shopify
to Cybersource.
Follow these steps to connect payments for your Shopify store. No coding is needed for this setup.
Three parts to the setup.
- Install the appFind Cybersource in Shopify’s payment settings
- Connect your accountSign in to Cybersource and confirm access
- Activate and verifyCheck a small payment in both accounts
Before you start
TrolleysPowered by Etail Depot
Cybersource connects your Shopify checkout to your merchant account. Start once Trolleys has confirmed your account is ready to accept payments.
- Your Shopify owner account
- The store owner must add or change the payment provider.
- Your Cybersource sign in
- Have your Cybersource sign in email from Trolleys ready.
- Your setup details from Etail
- Have Etail’s instructions for cards, currencies, payment capture and 3D Secure. Payment capture collects an authorized payment; 3D Secure adds a cardholder identity check.
Need your Cybersource sign in details? Contact Etail support.
Connect your store
Follow the steps in order. Select a screenshot to enlarge it. Your store may show different payment options or fees.
- Step 1
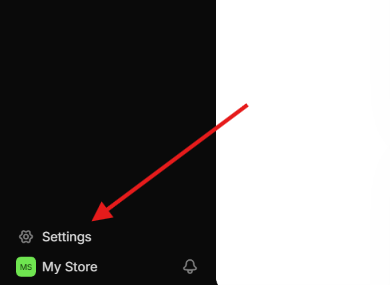
Open Settings
Sign in to the Shopify store you want to connect. On a computer, select Settings at the bottom of the menu. In the Shopify mobile app, open the menu, then Settings.
 Enlarge screenshot
The screenshots show Shopify on a computer. - Step 2
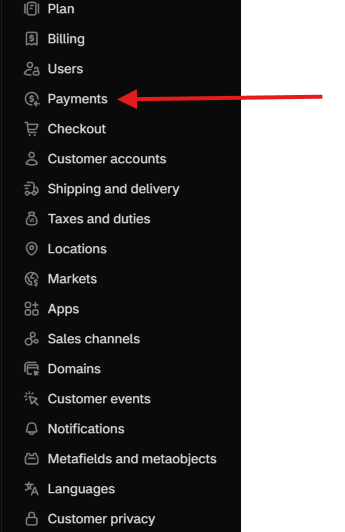
Open Payments
Select Payments in Settings. If you cannot add or change the payment provider, check that you are signed in as the store owner.
 Enlarge screenshot
Settings → Payments - Step 3
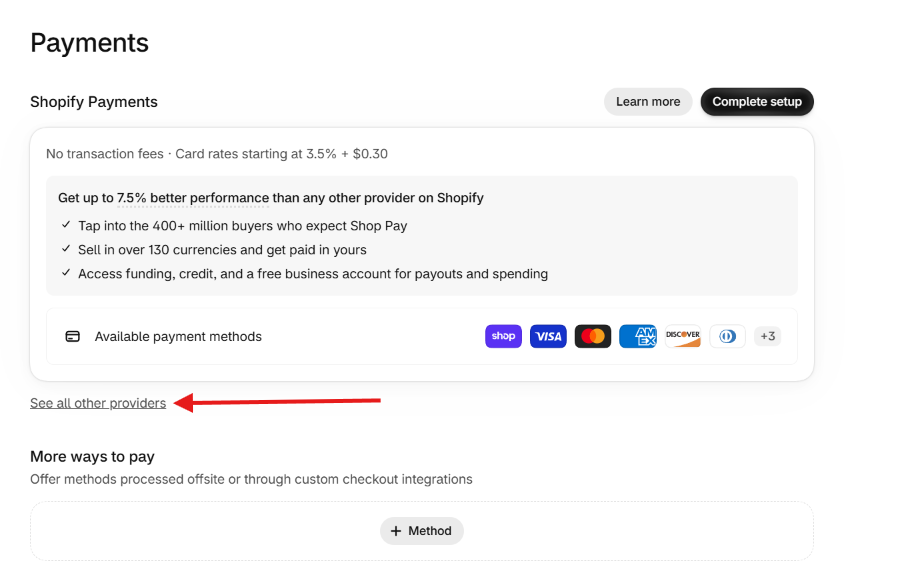
Find the provider list
In Settings → Payments, select See all other providers.
My screen looks different
- Shopify Payments is already active
- Select Manage, then Switch to a third-party provider. Shopify asks you to confirm the change.
- You use another card payment provider
- Select Choose another provider.
- Shopify Payments is unavailable
- Look for Choose a provider in Payment providers.
Already accepting payments? Confirm the switch with Etail first. Keep access to your previous provider for older orders and refunds.
 Enlarge screenshot
See all other providers in Shopify Payments. - Step 4
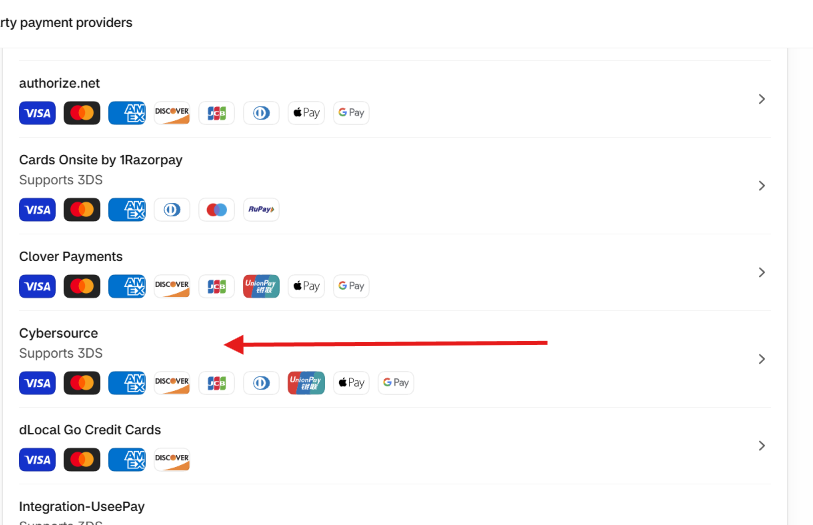
Choose Cybersource
Select Cybersource from the list. Do not choose Cybersource CAS, which is the separate app for testing.
 Enlarge screenshot
Choose Cybersource for your live store. - Step 5
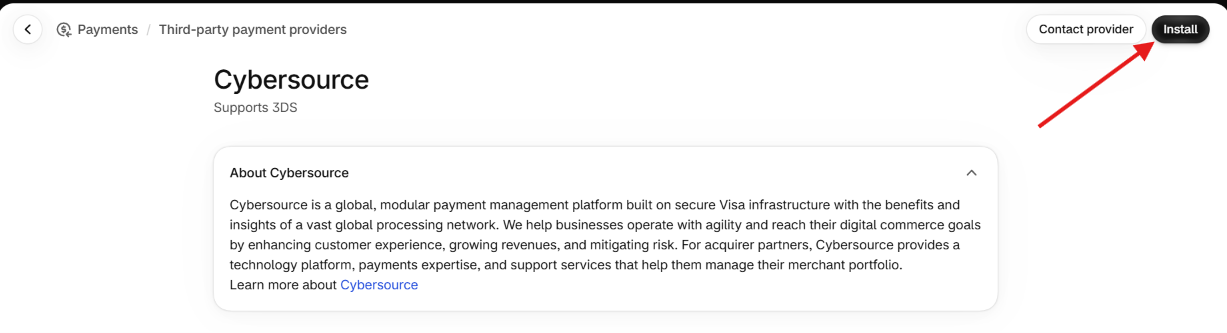
Select Install
On the Cybersource page, select Install to open the app permissions screen.
If Business Center is already open in another tab, sign out there before continuing.
 Enlarge screenshot
You will see another Install button on the next screen. - Step 6
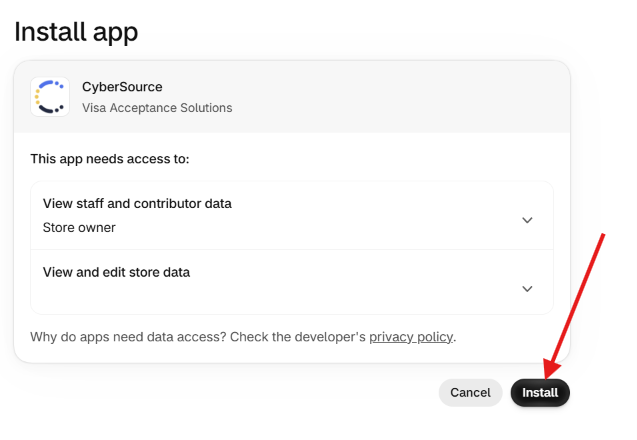
Review app access
Check that the app is Cybersource by Visa Acceptance Solutions. Read the permissions it requests. Select Install only if you agree.
Shopify then opens the Cybersource sign in page.
 Enlarge screenshot
This second Install button grants the access shown on the screen. - Step 7
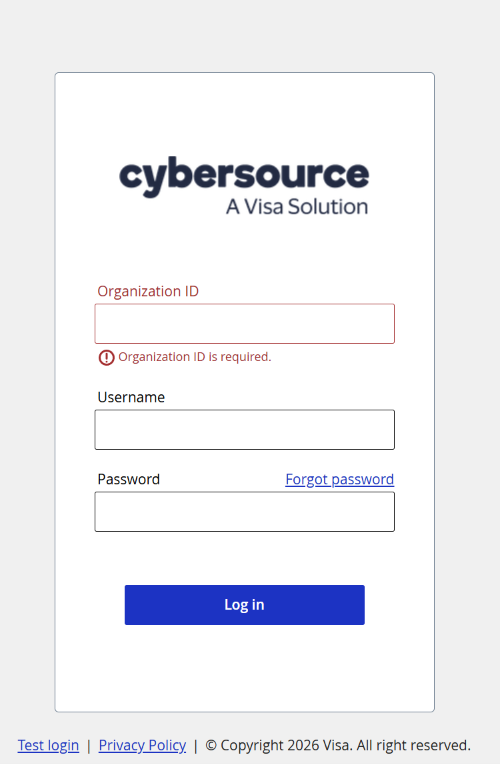
Open the Cybersource sign in page
Business Center is where you view and manage your Cybersource payments.
- Check for ebc2.cybersource.com in the address bar.
- Keep this page open while you find your account details in the next step.
This is a separate sign in from Shopify and your Trolleys merchant account.
 Enlarge screenshot
Cybersource Business Center. Find your sign in details in the next step. - Step 8
Check your email and sign in
Open the email from Trolleys, powered by Etail Depot, with your Cybersource account details.
- Find your Organization ID and Username, then follow the password instructions in the email.
- Return to the Cybersource page. Enter those details in Organization ID, Username and Password.
- Select Log in. Do not choose Test login.
Cannot find the email? Check your spam or junk folder, then ask Etail to help before continuing.
Your Cybersource sign in detailsInboxTrolleysto meHello,- Organization ID
- Provided in your account email
- Username
- Provided in your account email
- Password
- Follow the email instructions
TrolleysPowered by Etail DepotIllustrated email. Your message may look different. - Step 9
Review the account connection
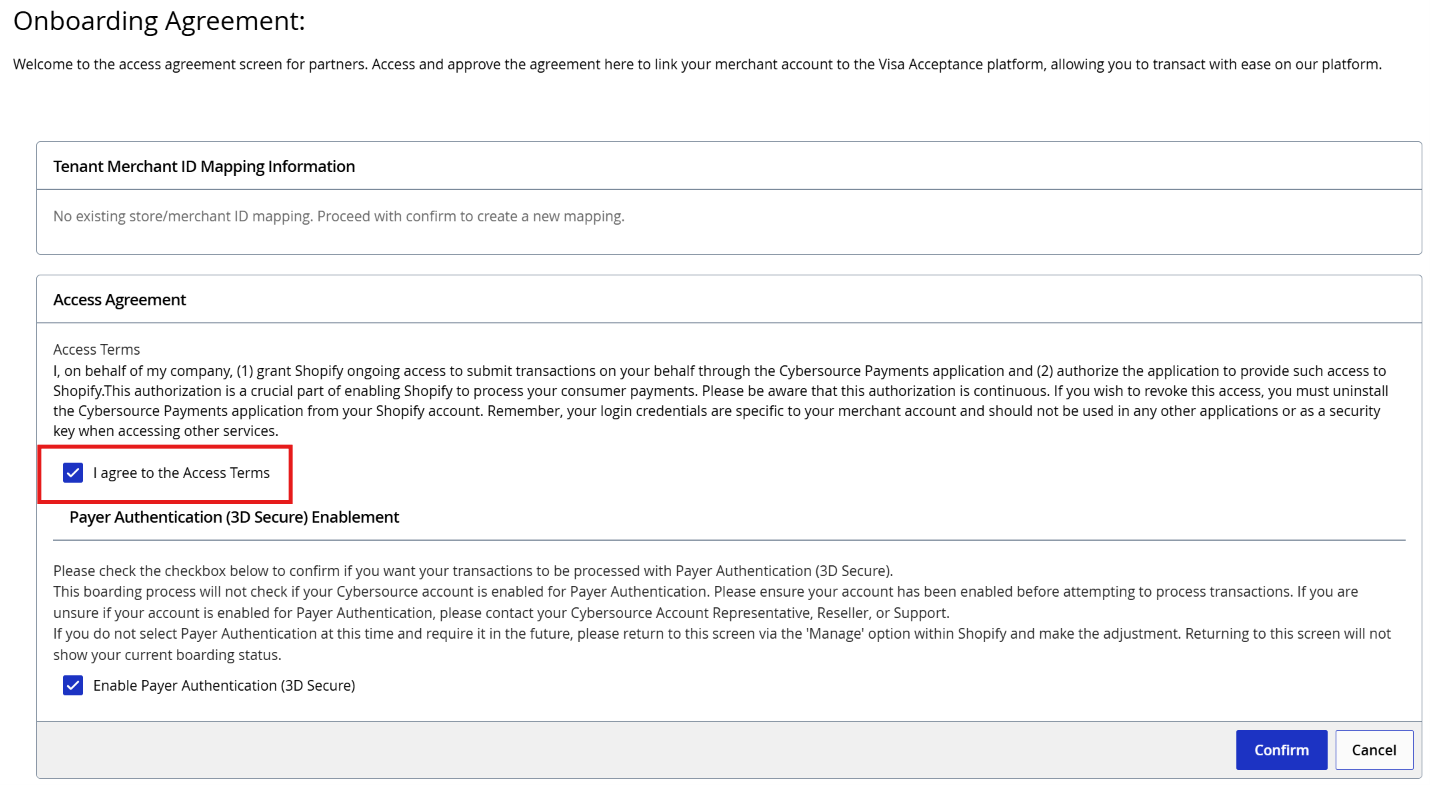
The Onboarding Agreement links your Shopify store to your Cybersource account.
- Under Tenant Merchant ID Mapping Information, check any existing account connection. If you do not recognize it, stop and ask Etail.
- Read the Access Terms. If you are authorized to accept them and agree, select I agree to the Access Terms.
- Select Enable Payer Authentication (3D Secure) only if Etail has confirmed it is enabled for your account and needed for this store.
- Select Confirm to return to Shopify.
Selecting the 3D Secure checkbox does not enable that service on your merchant account. It must already be set up.
 Enlarge screenshot
The checkboxes shown are examples. Use the settings confirmed for your account. - Step 10
Choose payment methods and activate
Back in Shopify, look for Installed beside Cybersource.
- Select only the cards and payment methods Etail confirmed for your account.
- Select Activate. Save any changes if Shopify prompts you.
Review the fees shown before activating. Shopify fees are separate from your gateway and processing fees.
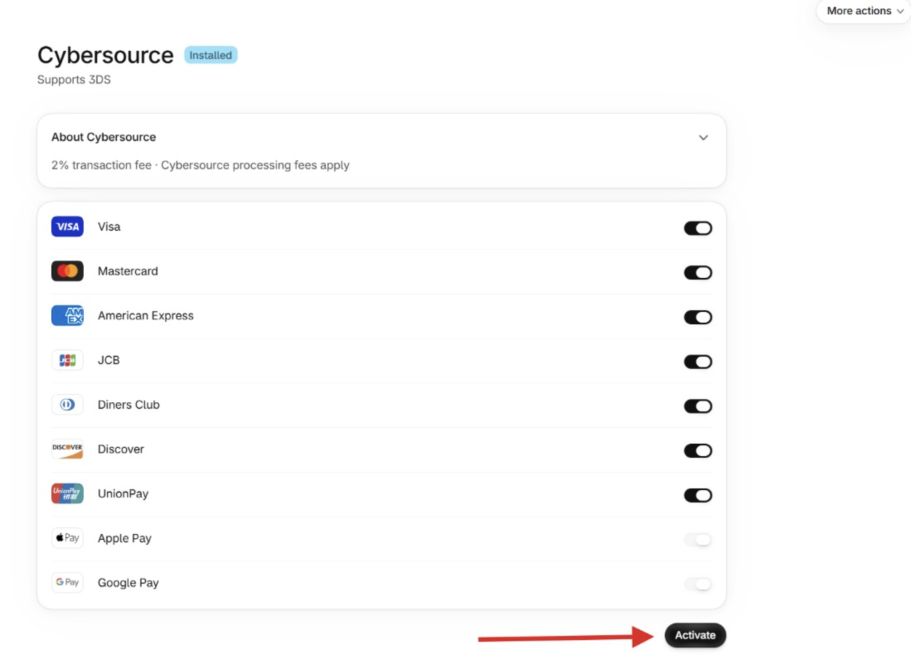 Enlarge screenshot
Installed means the app is connected. Activate turns it on for checkout. - Step 11
Confirm activation and payment settings
Return to Settings → Payments and look for Active beside Cybersource.
- Review Payment capture method. Confirm when payments will be collected, using the setting agreed with Etail.
- Open the Cybersource settings for Apple Pay or Google Pay if they are enabled for your account. Save any changes.
Next, verify a small live order in both accounts.
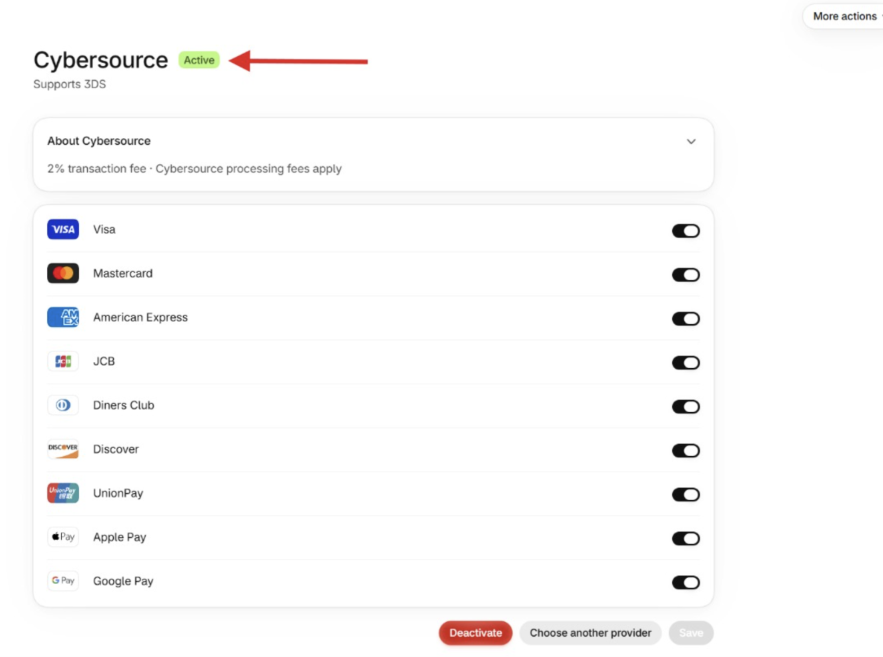 Enlarge screenshot
Active means the connection is enabled. It does not confirm a successful payment or payout. - Step 12
Verify the integration
Before taking customer orders, run one small live order. This is a real payment and fees may apply.
- Open your storefront, add an item to the cart and proceed to checkout.
- Enter shipping details and pay a small amount with a real card you are authorized to use.
- In Shopify, open Orders and select the order. Paid means the payment was captured; Authorized means it has not been captured yet. Under Timeline, expand the Cybersource payment, then Information from the gateway, and find the payment ID.
- In Business Center, go to Transaction Management → Transactions. Find the matching amount and currency, then open the transaction’s Request ID to see its details. The merchant reference number must match Shopify’s payment ID.
- Refund the full captured amount in Shopify to the original card and check Business Center. If the payment has not settled, it may be voided instead. For an authorization only, cancel the order and confirm its reversal in both accounts.
If a payment or reversal is missing from either account, or the amount is wrong, contact Etail Depot before taking customer orders.
Illustrated example Payment capturedShopifyOrders#1001PaidRefundPaid$5.00 USDTimelineA $5.00 USD payment was processed on Cybersource.Information from the gateway- Payment ID
- example7f2a91
Same payment ID, amount and currencyCybersourceBusiness CenterTransaction Management TransactionsTransaction detailsSuccessOrder information- Amount
- 5.00 USD
- Application
- Sale
- Merchant reference number
- example7f2a91
Then refund in ShopifyCheck the refund or void in Business Center.Example screens with fictional details. Your layout and status may differ with capture and settlement.