WooCommerce integration

Set up your
WooCommerce checkout.

Add card payments to your WooCommerce store on WordPress.com.

WordPress.com setup Updated November 7, 2026

Before you start

TrolleysPowered by Etail Depot

Start after Trolleys confirms your Cybersource account is ready for live payments with Unified Checkout.

WordPress.com store
A Business or Commerce plan, administrator access and a secure HTTPS store with a product ready to purchase.
Cybersource account email
The email from Trolleys with your Organization ID, Username and password setup instructions.
Mac or Windows computer
Follow the guide to download Cyberduck and upload your .p12 security file.

Need help? Contact Trolleys support.

Follow one step at a time

  1. Install the payment plugin

    1

    Open your WordPress store

    WordPress adminwordpress.com/log-in
    Plugins → Installed Plugins
    1. Open WP Admin. Sign in to WordPress.com, select your store, then choose WP Admin.
    2. Activate WooCommerce. In Plugins → Installed Plugins, find WooCommerce. If missing, add WooCommerce by Automattic and activate it.
    3. Check store details. Open WooCommerce Settings. Confirm your address, currency, product, cart and checkout.

    Back up your website. Keep your current payment option available until the new checkout works.

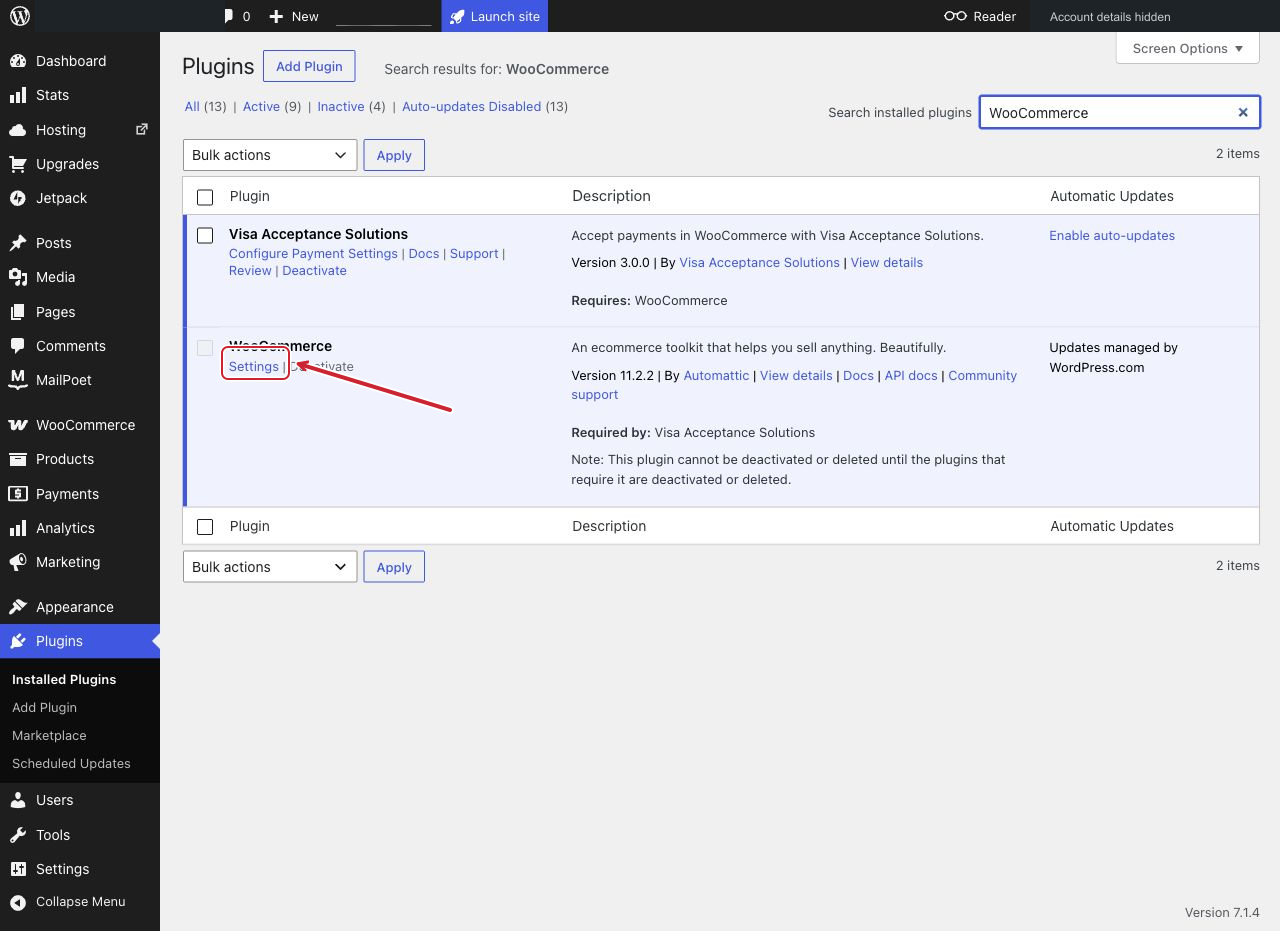
    WordPress Installed Plugins with the full navigation visible. A red arrow points to WooCommerce Settings.Enlarge screenshot
    Open Settings beneath WooCommerce to check your store details.

    Step 1: Open your WordPress store

    WordPress Installed Plugins with the full navigation visible. A red arrow points to WooCommerce Settings.

    Open Settings beneath WooCommerce to check your store details.

  2. 2

    Install Visa Acceptance Solutions

    WordPress adminwordpress.com/log-in
    Plugins → Add Plugin
    1. Search for Visa Acceptance Solutions. Choose the plugin by Visa Acceptance Solutions, without “SMB” in its name.
    2. Install Now, then Activate. If already active, continue.
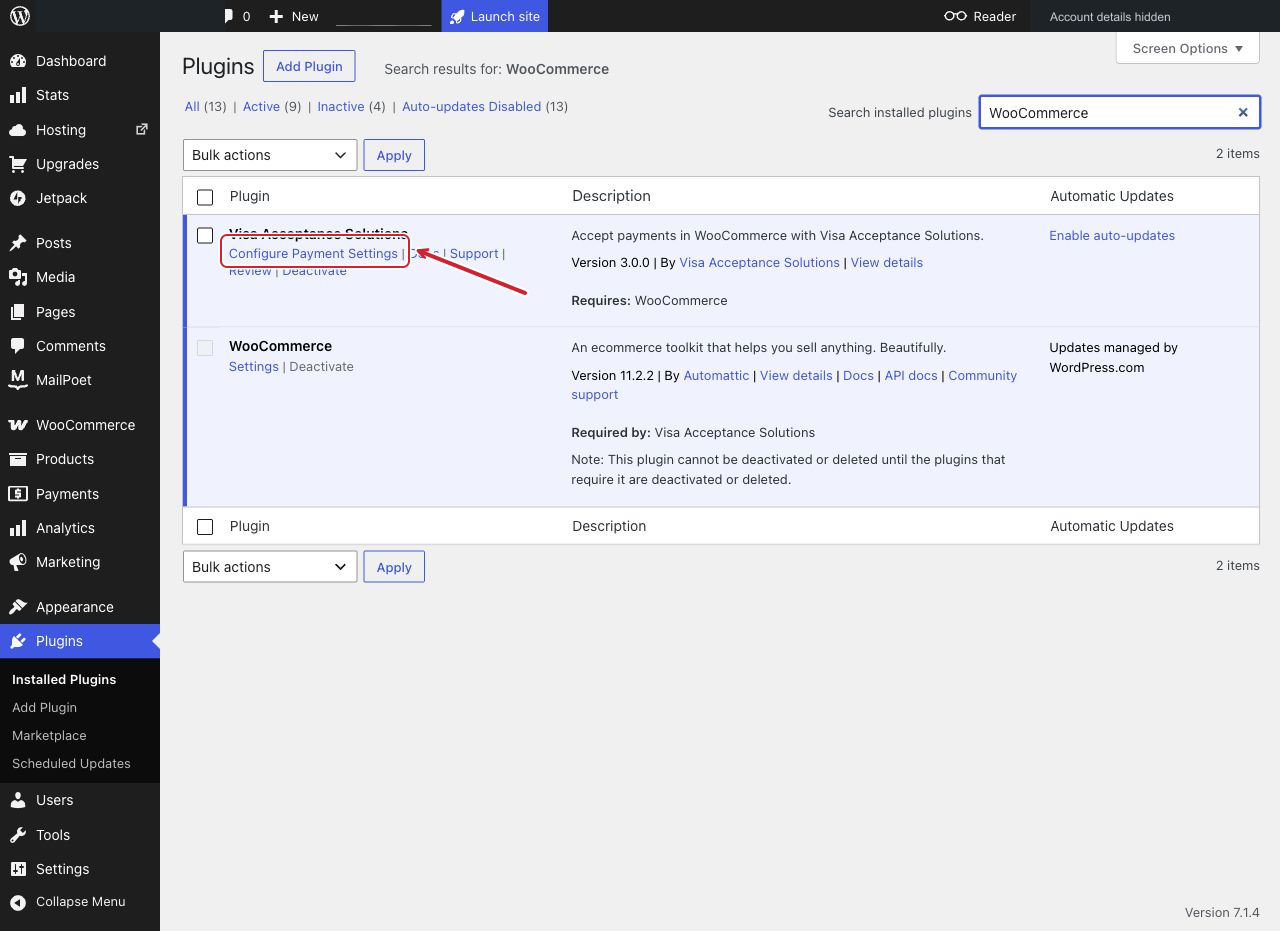
    WordPress plugin list with a red arrow pointing to Configure Payment Settings beneath Visa Acceptance Solutions.Enlarge screenshot
    Visa Acceptance Solutions 3.0.0. Select Configure Payment Settings to open its settings.

    Step 2: Install Visa Acceptance Solutions

    WordPress plugin list with a red arrow pointing to Configure Payment Settings beneath Visa Acceptance Solutions.

    Visa Acceptance Solutions 3.0.0. Select Configure Payment Settings to open its settings.

  3. 3

    Open your WooCommerce payment settings

    WordPress adminwordpress.com/log-in
    WooCommerce → Settings → Payments
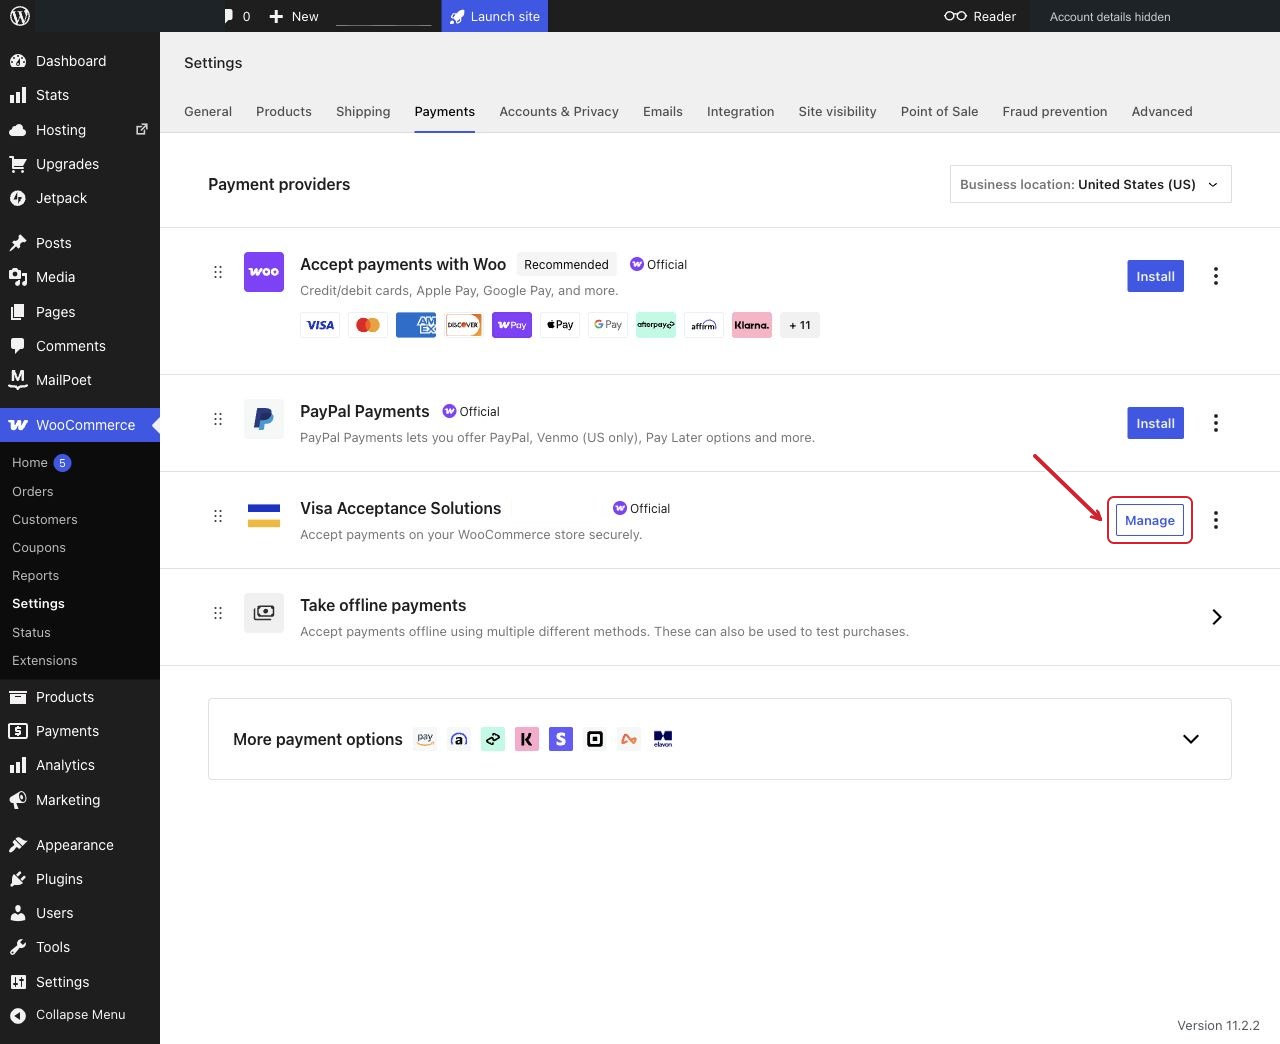
    1. Find Visa Acceptance Solutions. Select Manage beside it. Keep this payment settings tab open.
    WooCommerce Payments screen with the provider list visible. A red arrow points to Manage beside Visa Acceptance Solutions.Enlarge screenshot
    Select Manage beside Visa Acceptance Solutions.

    Step 3: Open your WooCommerce payment settings

    WooCommerce Payments screen with the provider list visible. A red arrow points to Manage beside Visa Acceptance Solutions.

    Select Manage beside Visa Acceptance Solutions.

  4. Get your keys and security file

    4

    Find your account email

    Your email inbox
    Your inbox → Account email from Trolleys
    1. Open the Trolleys email. Find your Cybersource Organization ID and Username. Follow the email to set your Cybersource password.

    Missing the email? Contact Trolleys before continuing. Do not create another merchant account.

    Your Cybersource sign in detailsInbox
    Trolleysto me
    Hello,
    Use your Cybersource account details to connect your WooCommerce store.
    Organization ID
    example_company
    Username
    store_admin
    Password
    Follow the email instructions
    Return to Business Center and enter your details to sign in.
    TrolleysPowered by Etail Depot
    Illustrated email with fictional account details. Use the details sent to you.
  5. 5

    Sign in to Cybersource

    Cybersource Business Centerubc.cybersource.com
    Live Business Center → Log in
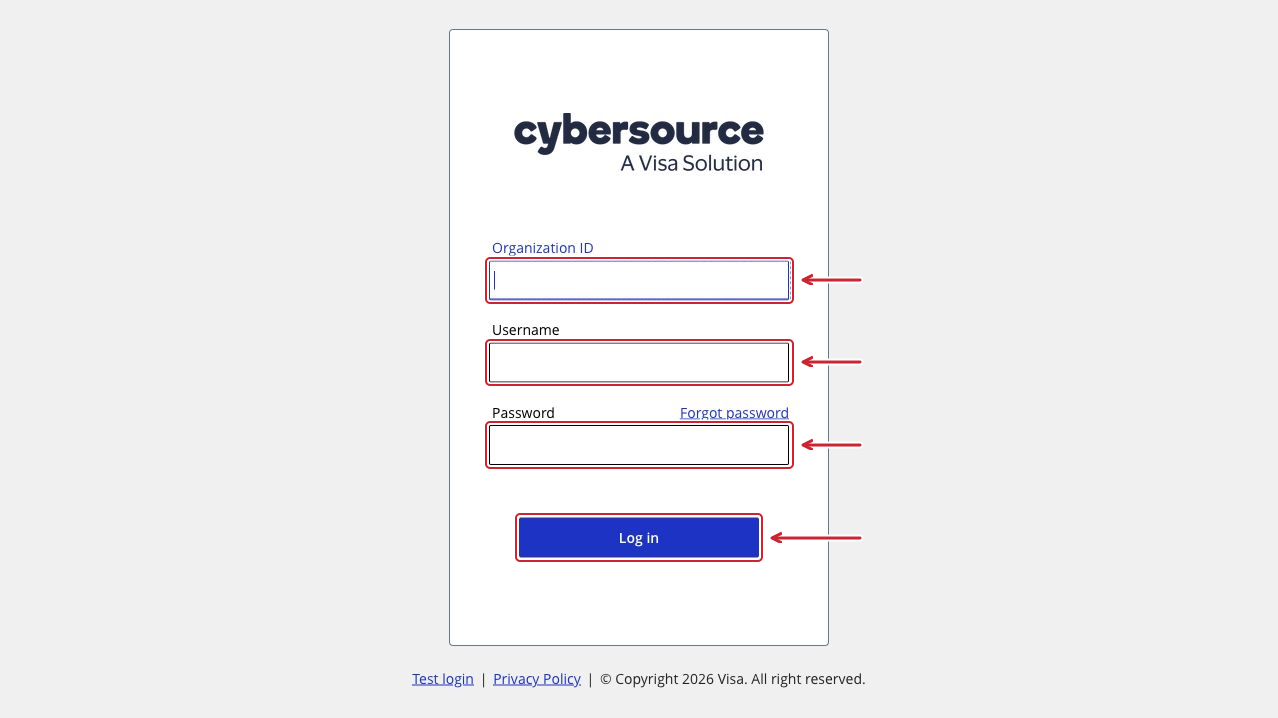
    1. Enter Organization ID and Username. Use the details from your Trolleys email.
    2. Enter your Cybersource password. Select Log in and complete any verification.

    Use your Cybersource password, not your WordPress password. Do not select Test login.

    Live Cybersource Business Center sign in page with blank Organization ID, Username and Password fields. Red arrows mark each field and the Log in button.Enlarge screenshot
    Live Cybersource sign in. Use the details from your account email.

    Step 5: Sign in to Cybersource

    Live Cybersource Business Center sign in page with blank Organization ID, Username and Password fields. Red arrows mark each field and the Log in button.

    Live Cybersource sign in. Use the details from your account email.

  6. 6

    Copy and paste your API details

    Cybersource Business Centerubc.cybersource.com
    Payment Configuration → Key Management

    Cybersource

    Copy the two values

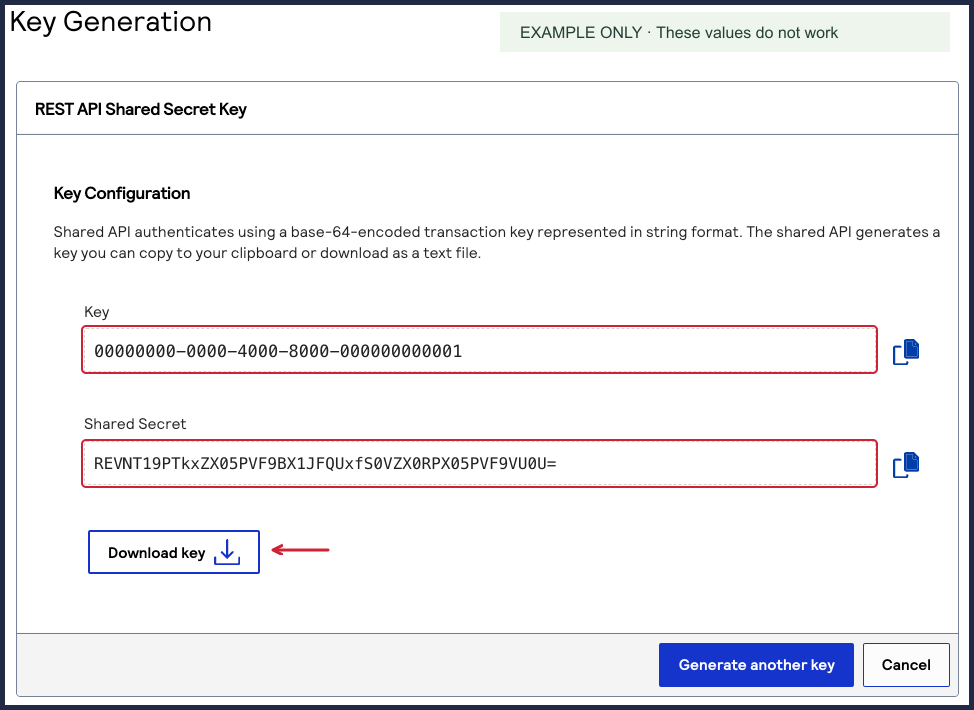
    If Trolleys supplied your Key ID and Shared Secret, use those. Otherwise, choose Generate key → REST – Shared Secret → Generate key.

    Copy Key and Shared Secret. Save both privately.

    These are text values. Do not upload the Shared Secret download.

    Cybersource Key Generation result with a visible fictional Key ID and Shared Secret. A red arrow points to Download key.Enlarge screenshot
    Copy the two highlighted text values. Examples shown do not work.

    Step 6.a: Copy Key and Shared Secret

    Cybersource Key Generation result with a visible fictional Key ID and Shared Secret. A red arrow points to Download key.

    Copy the two highlighted text values. Examples shown do not work.

    WordPress admin

    Paste them into WooCommerce

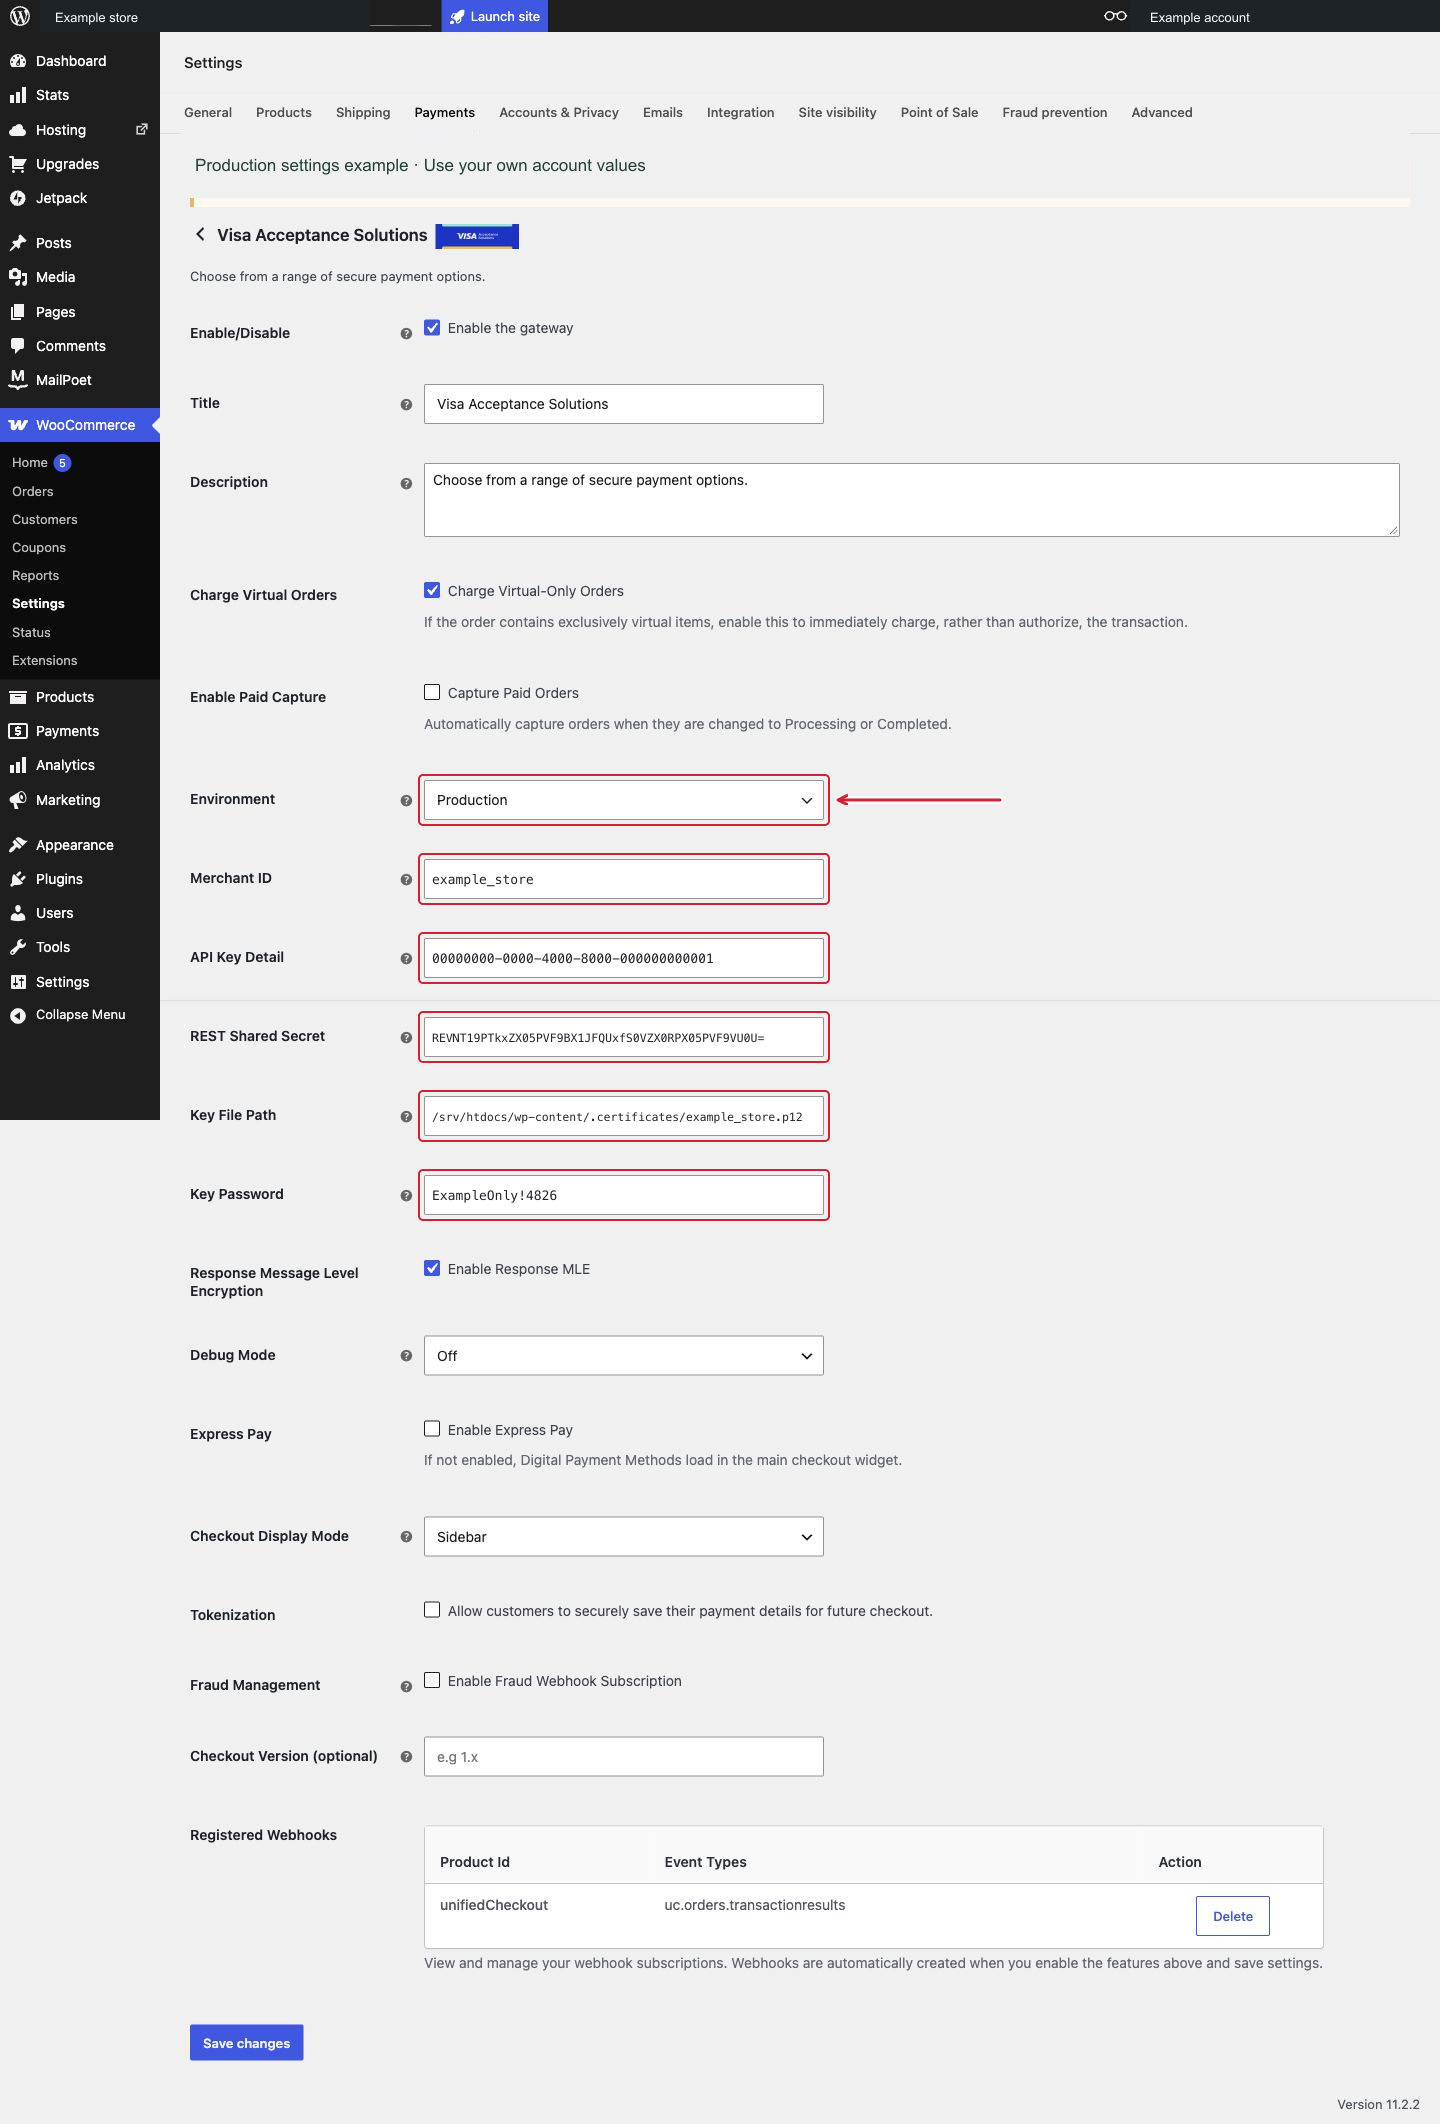
    Choose Production. Enter your Merchant ID from Trolleys, then paste the two values:

    Key / Key ID
    API Key Detail
    Shared Secret
    REST Shared Secret

    Leave this tab open. You will save after adding the .p12 details.

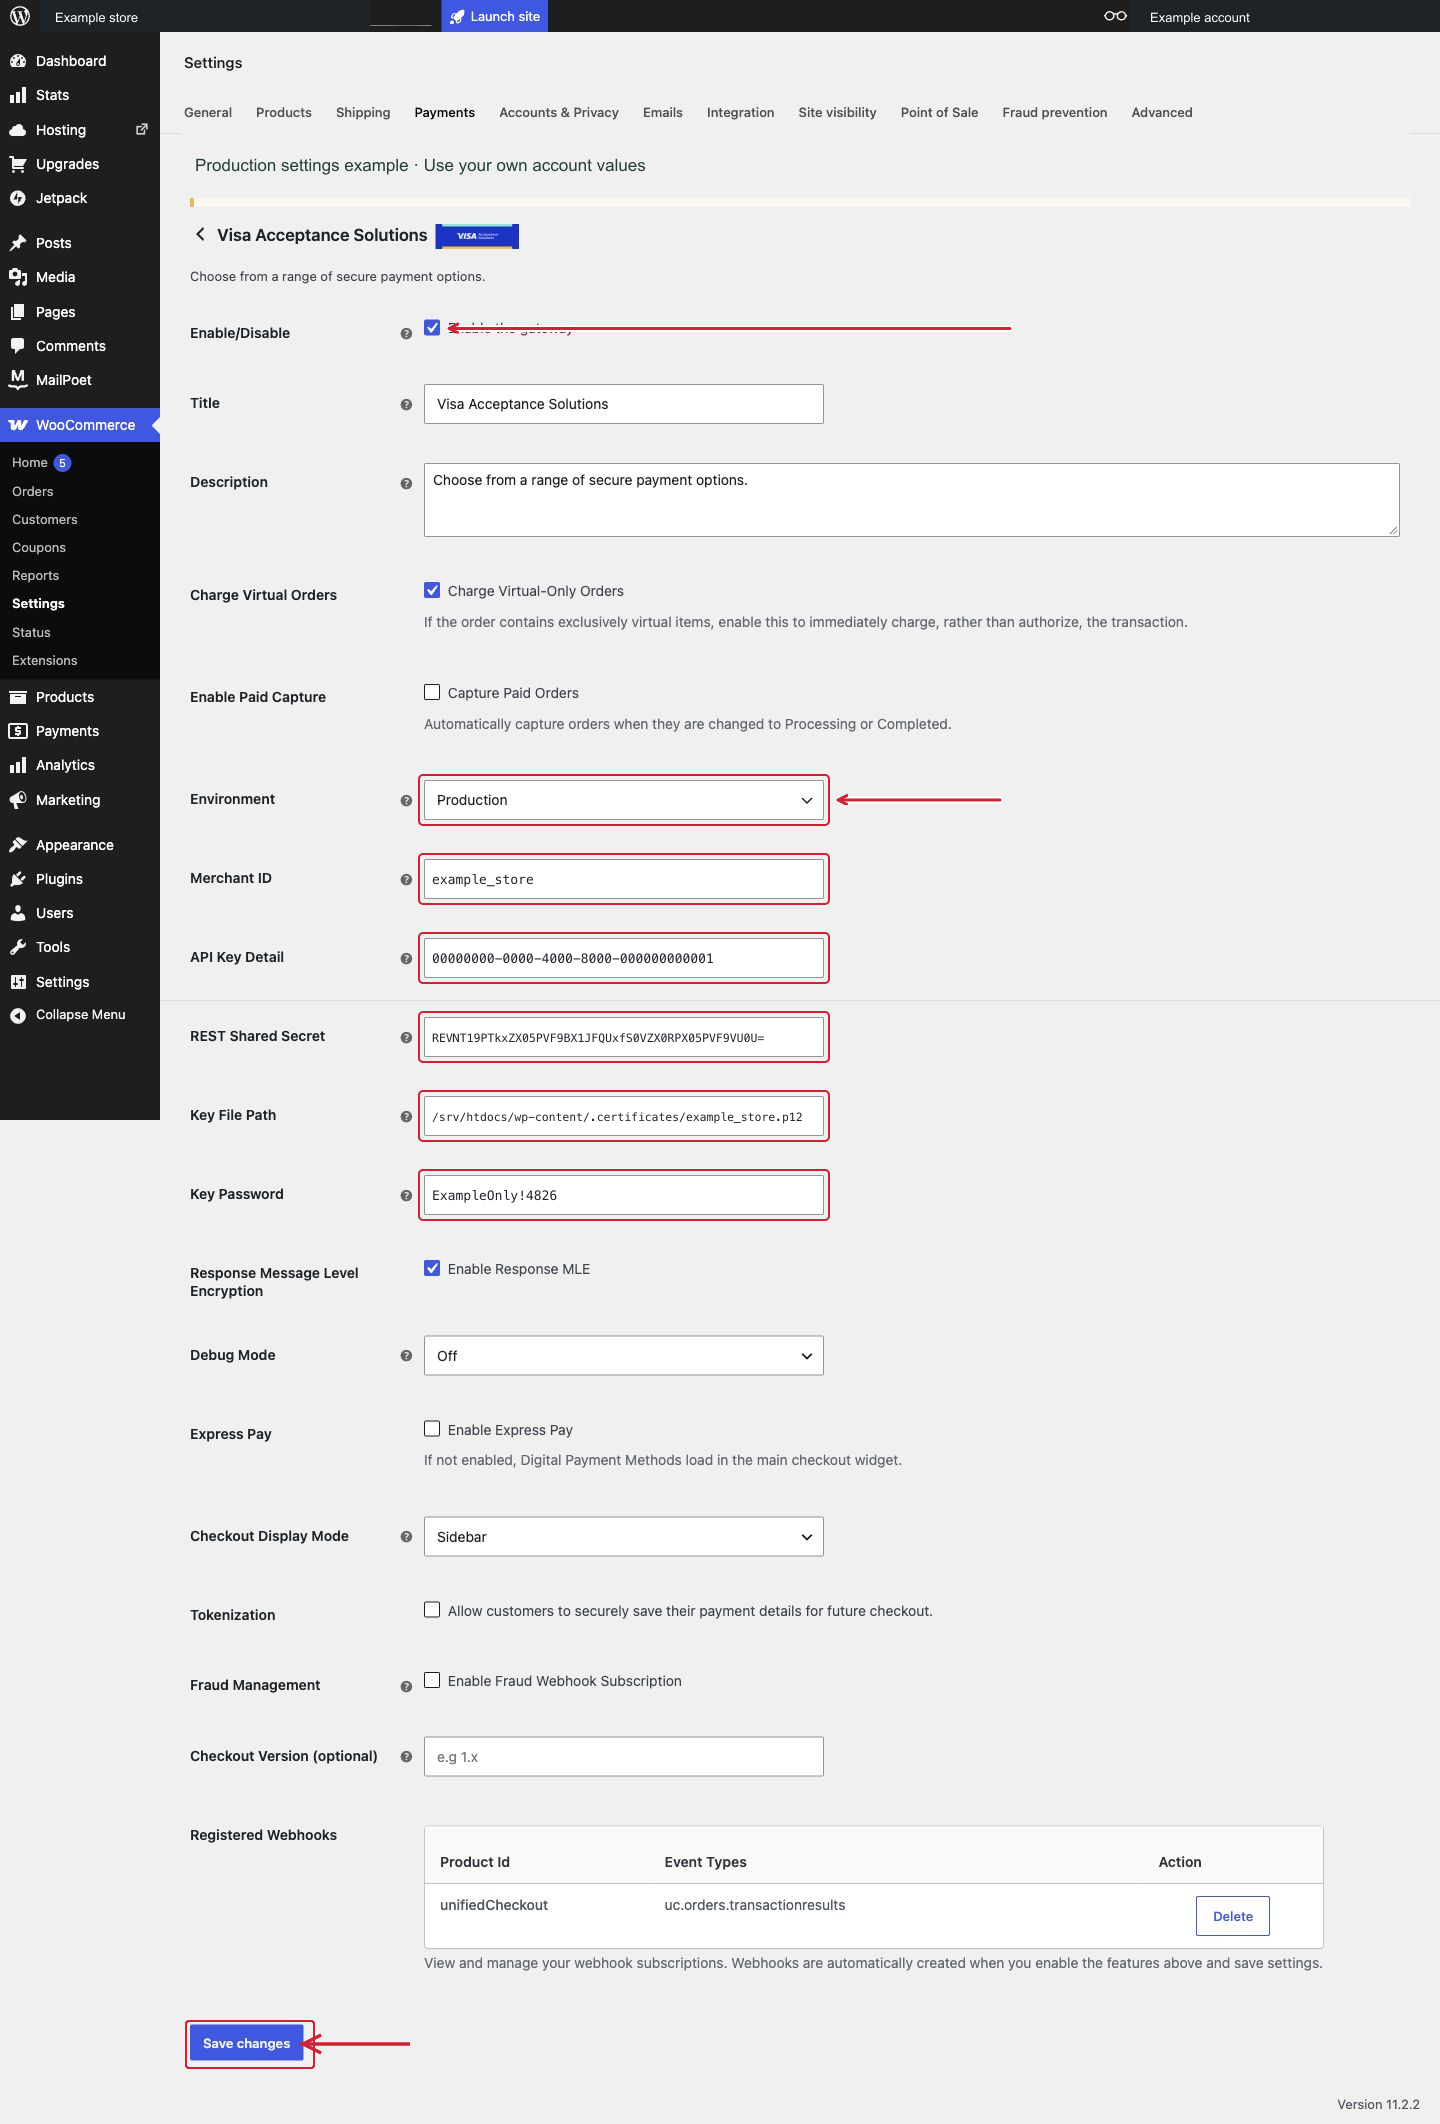
    Production configuration example in the real WooCommerce form. Arrows mark Production, live credential fields and protected certificate details. Fictional example values replace private credentials.Enlarge screenshot
    The live Shared Secret field is labelled REST Shared Secret.

    Step 6.b: Paste the API details

    Production configuration example in the real WooCommerce form. Arrows mark Production, live credential fields and protected certificate details. Fictional example values replace private credentials.

    The live Shared Secret field is labelled REST Shared Secret.

  7. 7

    Download your .p12 file

    Cybersource Business Centerubc.cybersource.com
    Key Management → Generate key → REST – API Response MLE

    If Trolleys already supplied a .p12 file and its password, use them.

    Cybersource

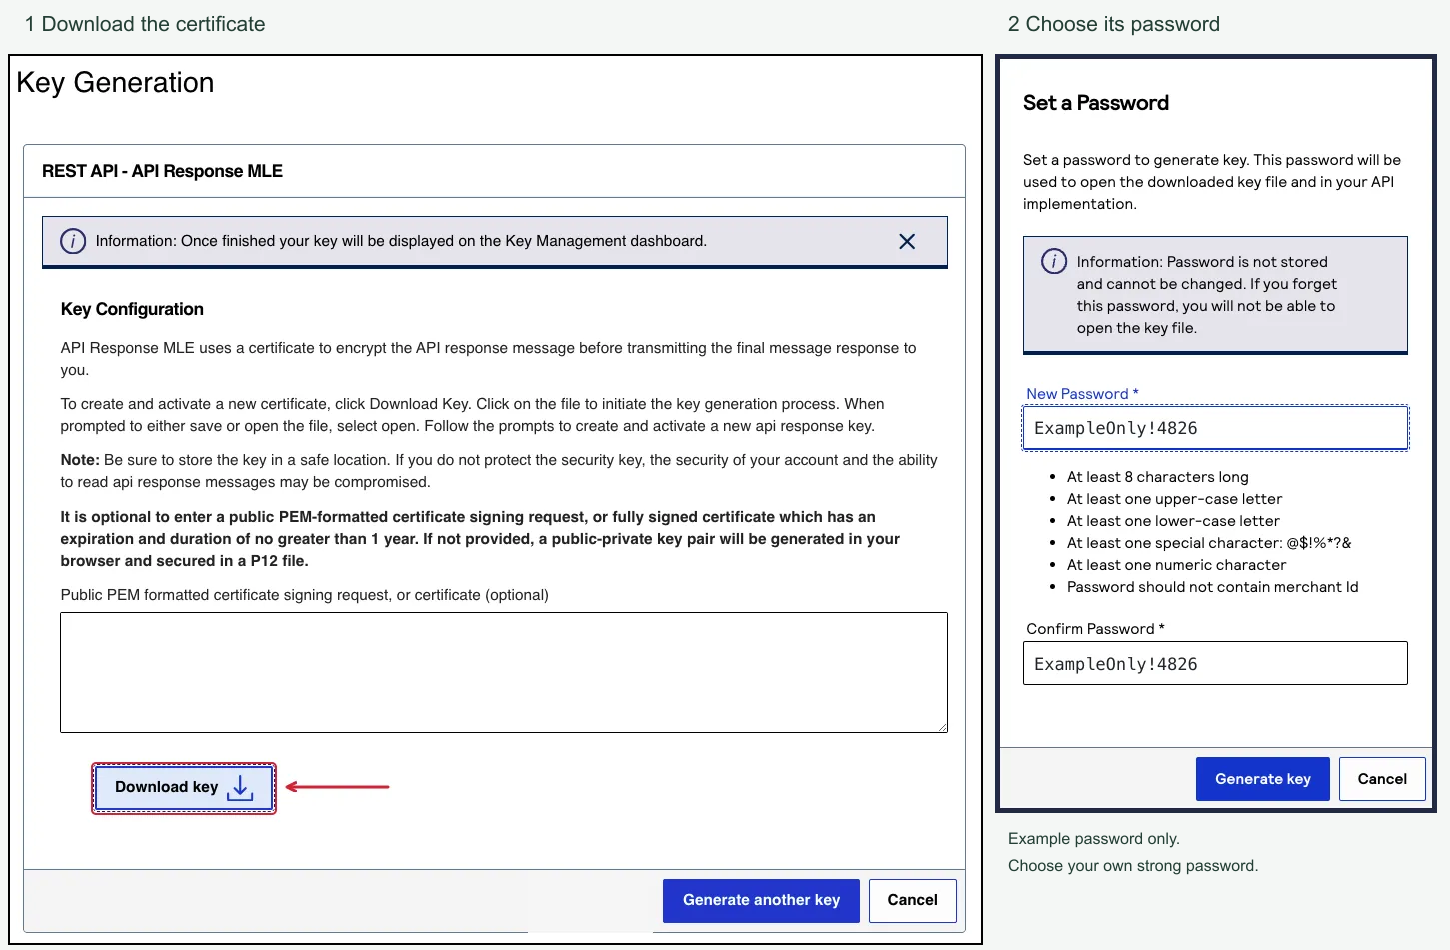
    Click Download key

    In Key Management, choose Generate key → REST – API Response MLE → Generate key.

    Leave the optional certificate box empty. Click Download key.

    Two Cybersource screens: Download key for REST API Response MLE, followed by Set a Password. A fictional password is shown in both confirmation fields.Enlarge screenshot
    Leave the optional box empty, then click Download key.

    Step 7.a: Download the certificate

    Two Cybersource screens: Download key for REST API Response MLE, followed by Set a Password. A fictional password is shown in both confirmation fields.

    Leave the optional box empty, then click Download key.

    Cybersource

    Choose the file’s password

    Enter a strong password in both boxes, then click Generate key.

    Save this password in your password manager. Your browser downloads the .p12 file.

    Two Cybersource screens: Download key for REST API Response MLE, followed by Set a Password. A fictional password is shown in both confirmation fields.Enlarge screenshot
    Save this password for the WooCommerce Key Password field. Example shown.

    Step 7.b: Choose the certificate password

    Two Cybersource screens: Download key for REST API Response MLE, followed by Set a Password. A fictional password is shown in both confirmation fields.

    Save this password for the WooCommerce Key Password field. Example shown.

    Saved on your computer · Example filenameexample_store.p12

    Use your own downloaded file. Keep its name unchanged.

    Find the .p12 in Downloads. Leave it unopened. This is the one file to upload.

  8. Upload the file and save

    8

    Upload your .p12 file with Cyberduck

    WordPress.com file accessmy.wordpress.com/sites
    WordPress.com file access → Cyberduck → Your store’s files
    Move this file to your store · Example filenameexample_store.p12

    Use your own downloaded file. Keep its name unchanged.

    Computer → Cyberduck → Your store. The pictures show Mac; Windows uses the same fields.

    8.1

    Get your file access details

    WordPress.com

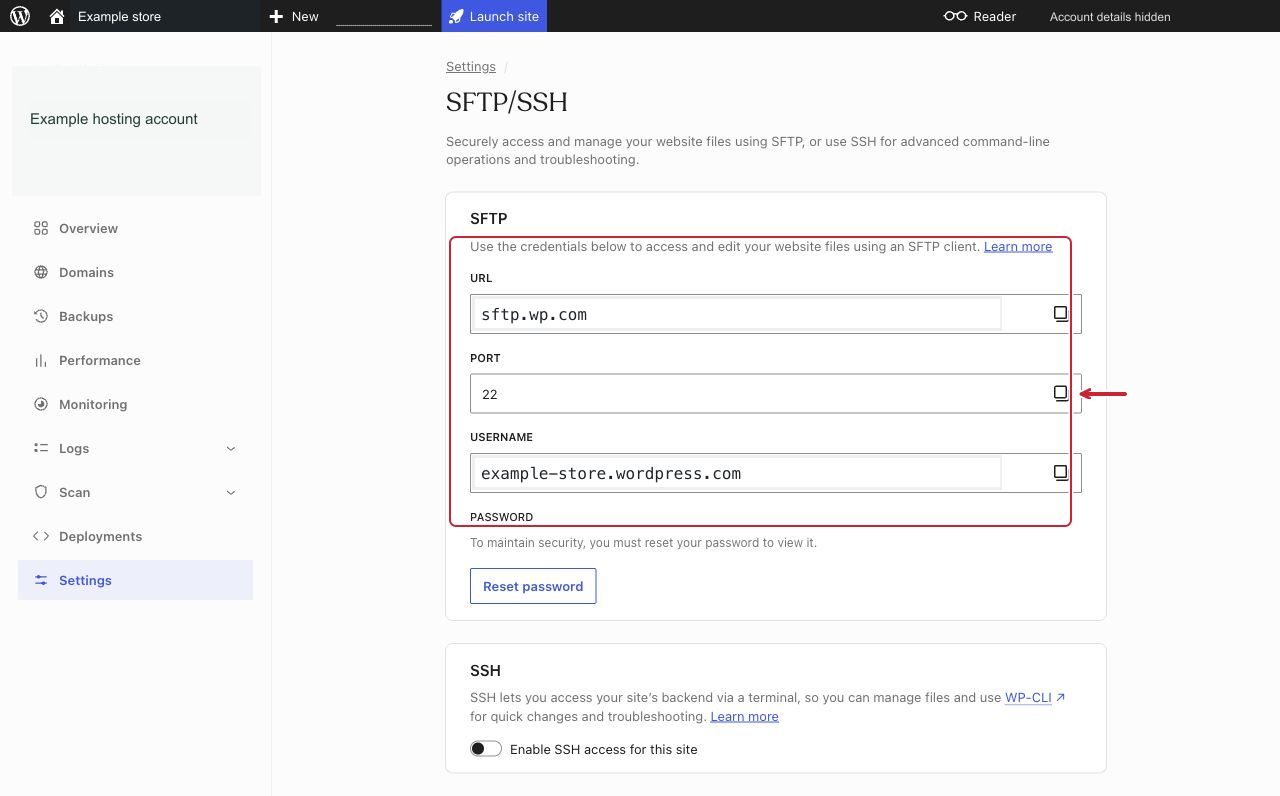
    Select your store, then Settings → SFTP/SSH.

    Click Create credentials if shown. Save the password and leave this tab open. SSH can stay disabled.

    This is the file access password, separate from your WordPress sign in.

    Full WordPress.com SFTP screen. The connection details area is marked. The public WordPress.com SFTP host is shown with a fictional username.Enlarge screenshot
    Use the server, port, username and password for your own store.

    Step 8.1: Get file access details

    Full WordPress.com SFTP screen. The connection details area is marked. The public WordPress.com SFTP host is shown with a fictional username.

    Use the server, port, username and password for your own store.

    8.2

    Open Cyberduck

    Your browser

    Download Cyberduck from cyberduck.io/download.

    Mac: Open the .zip, move Cyberduck to Applications and open it.

    Windows: Open the installer, finish installation and open Cyberduck.

    Cyberduck’s official download area. Red arrows point to the Windows and macOS downloads.Enlarge screenshot
    Use the download for your computer. A paid edition is not needed.

    Step 8.2: Download Cyberduck

    Cyberduck’s official download area. Red arrows point to the Windows and macOS downloads.

    Use the download for your computer. A paid edition is not needed.

    8.3

    Connect to your store

    Cyberduck

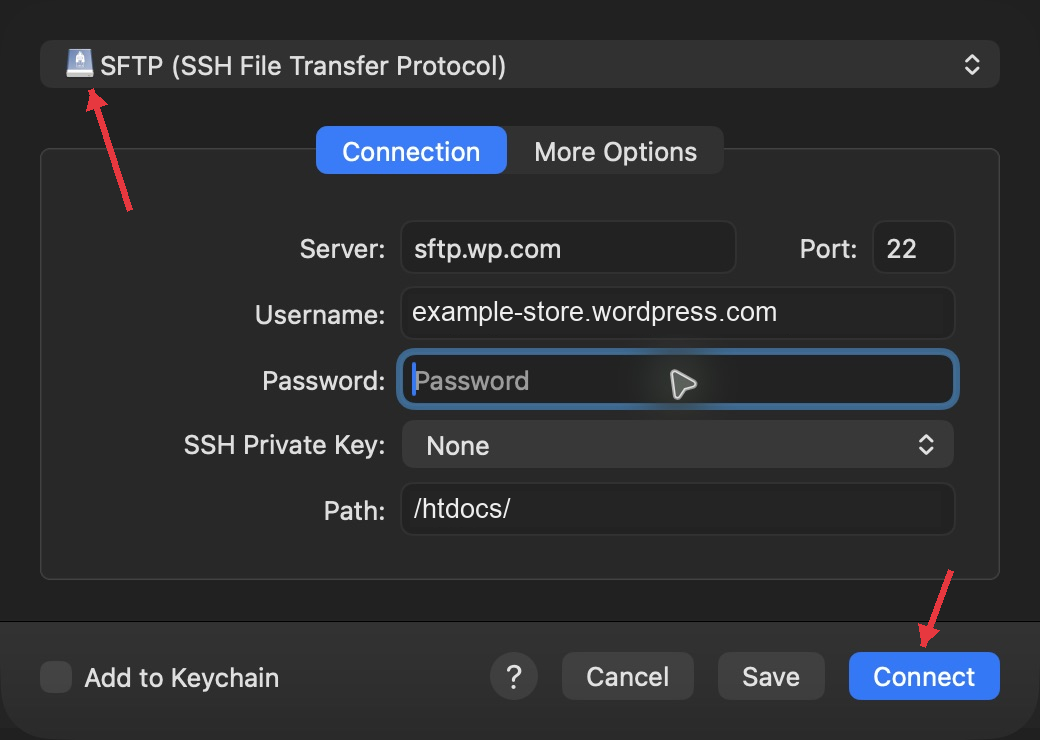
    Click Open Connection and choose SFTP.

    Server
    sftp.wp.com
    Port
    22
    Username
    Your WordPress.com SFTP username
    Password
    Your file access password
    Path
    /htdocs/

    Open More Options if Path is hidden. Click Connect.

    Use the SFTP password here, not the .p12 password.

    If a fingerprint message appears

    For the first connection, check that the server is sftp.wp.com, then select Allow. If a saved fingerprint has changed, stop and check with WordPress.com.

    Cyberduck Open Connection with SFTP selected, server sftp.wp.com, port 22 and path /htdocs/. The username is fictional and the password field is blank. An arrow points to Connect.Enlarge screenshot
    Copy the SFTP details from your open WordPress.com tab, then click Connect.

    Step 8.3: Connect Cyberduck

    Cyberduck Open Connection with SFTP selected, server sftp.wp.com, port 22 and path /htdocs/. The username is fictional and the password field is blank. An arrow points to Connect.

    Copy the SFTP details from your open WordPress.com tab, then click Connect.

    8.4

    Create a folder for your .p12

    Cyberduck

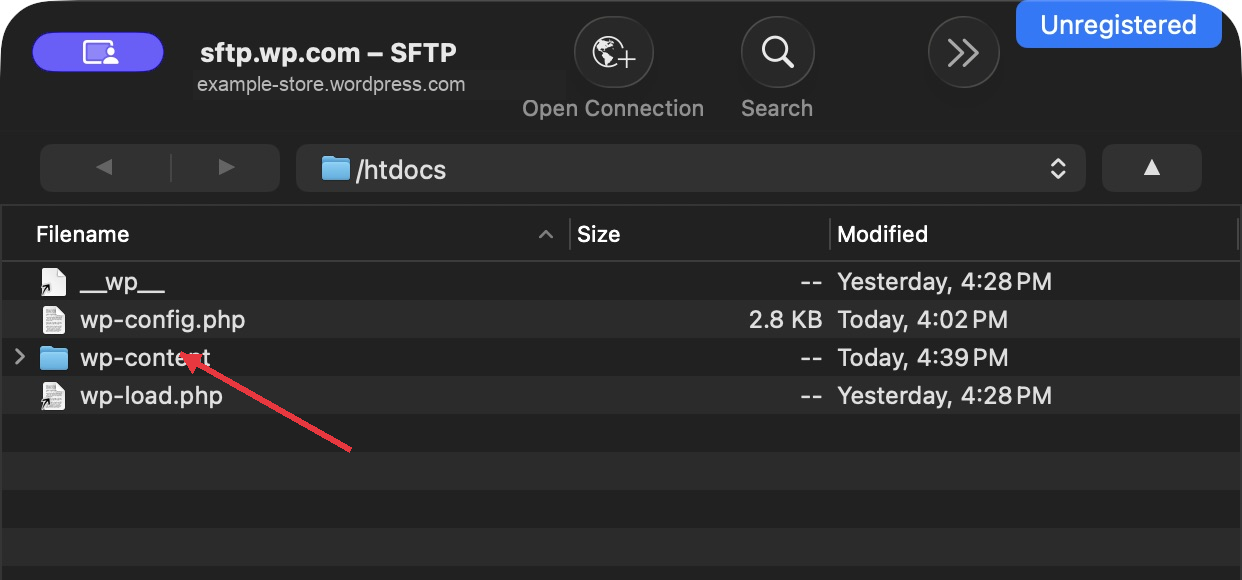
    Open htdocs → wp-content. You may already be inside htdocs.

    Select View → Show Hidden Files, then File → New Folder.

    Name the folder .certificates, including the first dot. Click Create, or open it if it already exists. This is a folder you create, not another file to download.

    The folder must block public downloads before you upload the .p12. A dot in its name or file permissions alone does not guarantee this. If unsure, contact Trolleys.

    Cyberduck inside /htdocs. An arrow points to the wp-content folder. The account name is fictional.Enlarge screenshot
    Open wp-content, then create the certificate folder inside it.

    Step 8.4: Open wp-content

    Cyberduck inside /htdocs. An arrow points to the wp-content folder. The account name is fictional.

    Open wp-content, then create the certificate folder inside it.

    8.5

    Set the folder permissions

    Cyberduck

    Select the .certificates folder, then File → Info → Permissions.

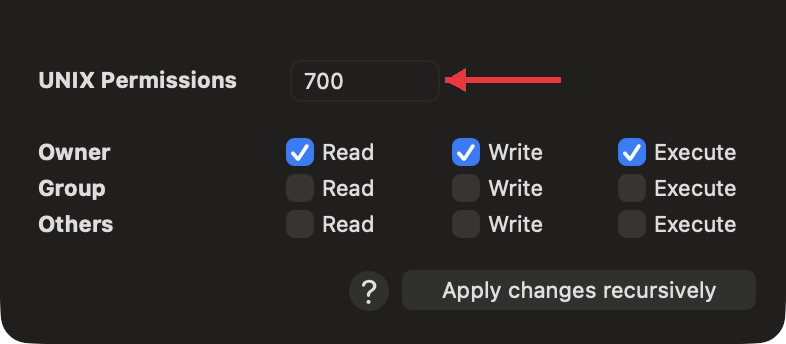
    Enter 700 and press Tab. Close and reopen Info to check that 700 remains.

    Cyberduck folder permissions set to 700. Only the owner has read, write and execute permission.Enlarge screenshot
    Set the folder to 700. Keep Apply changes recursively unselected.

    Step 8.5: Set folder permissions

    Cyberduck folder permissions set to 700. Only the owner has read, write and execute permission.

    Set the folder to 700. Keep Apply changes recursively unselected.

    8.6

    Upload the .p12 from your computer

    Cyberduck

    Open the .certificates folder. If clicking only expands it, choose Go → Inside.

    Select File → Upload. Open Downloads, or the folder where your browser saved the file.

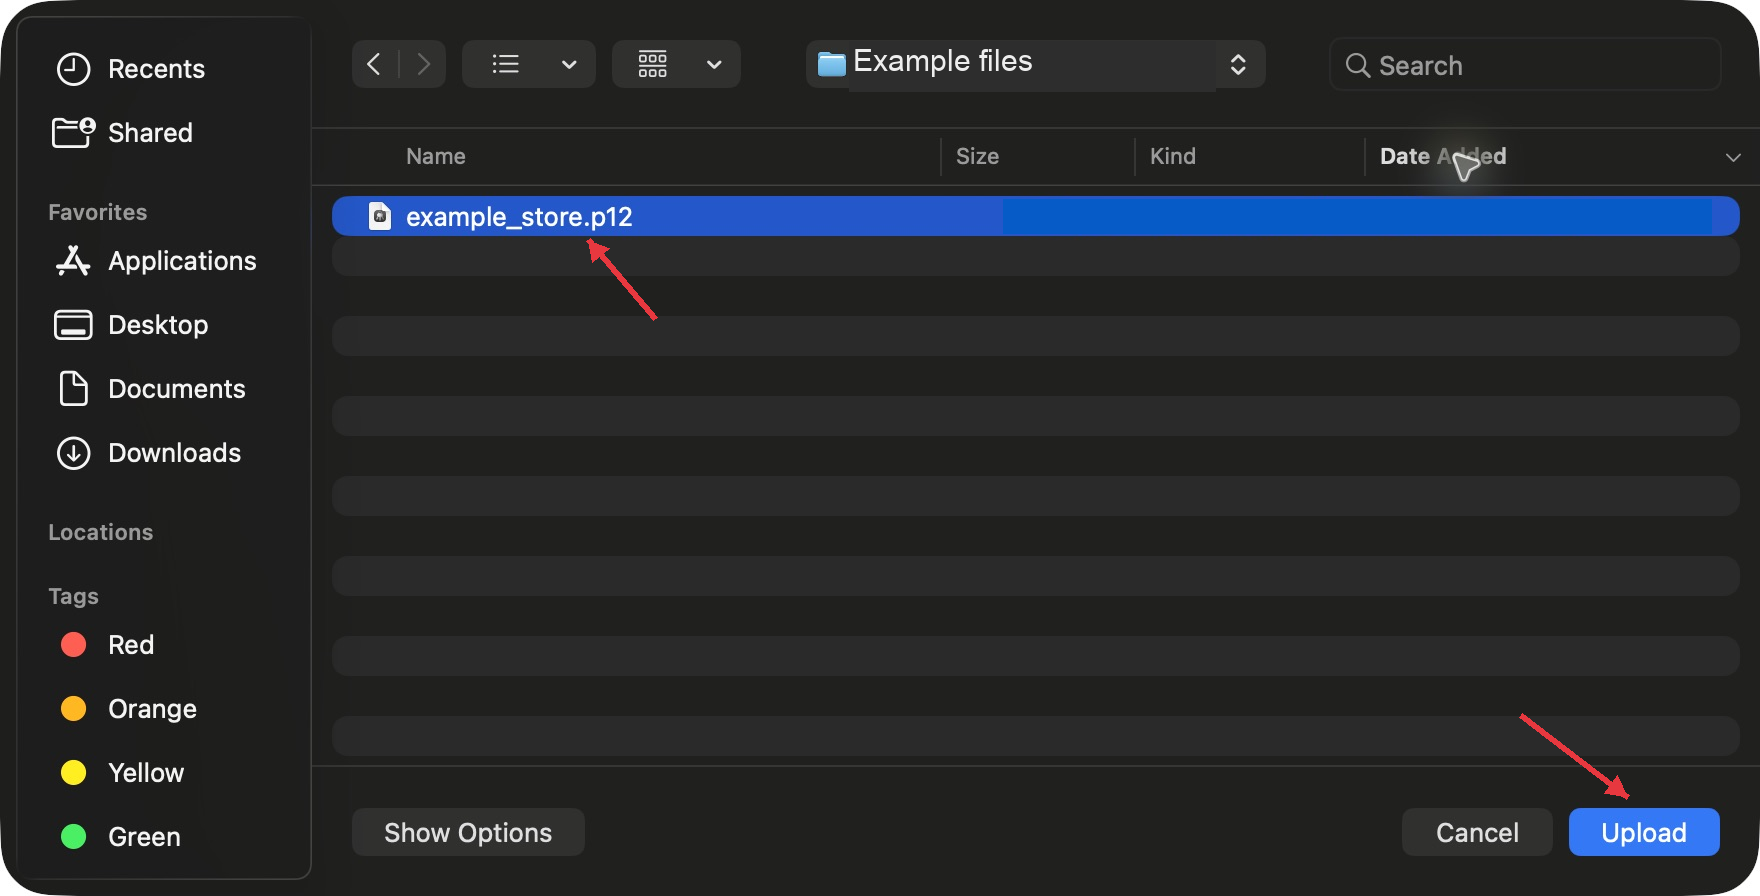
    Select your .p12 file and click Upload.

    Upload only your .p12 file, not the Shared Secret record.

    The downloaded .p12 file selected in Cyberduck’s file picker. The filename is a fictional example.The Upload button in the same file picker.Enlarge screenshot
    Select your .p12, then click Upload. Two close views of the same screen; tap to see the full screenshot.

    Step 8.6: Select your .p12 file

    Cyberduck’s file picker on Mac with a fictional example_store.p12 file selected. An arrow points to Upload. This example file is not a working certificate.

    Select your .p12, then click Upload. Two close views of the same screen; tap to see the full screenshot.

    8.7

    Wait for Upload complete

    Cyberduck

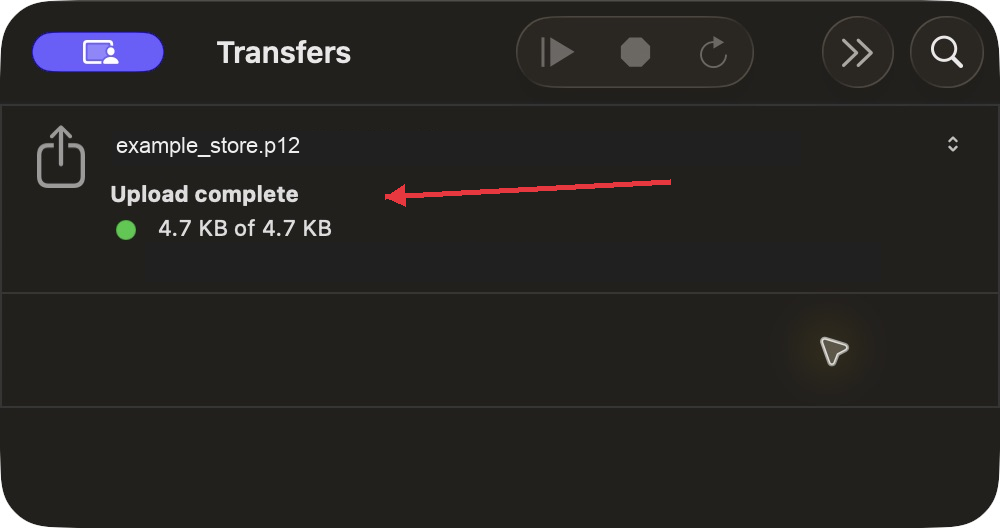
    Look for Upload complete in the Transfers window.

    If the window is hidden, select Window → Transfers. Do not continue while the upload is running or failed.

    Cyberduck Transfers showing Upload complete. The certificate filename has been replaced with example_store.p12.Enlarge screenshot
    The upload is finished when Cyberduck shows Upload complete.

    Step 8.7: Confirm the upload

    Cyberduck Transfers showing Upload complete. The certificate filename has been replaced with example_store.p12.

    The upload is finished when Cyberduck shows Upload complete.

    8.8

    Protect the uploaded .p12

    Cyberduck

    Select the uploaded .p12, then File → Info → Permissions.

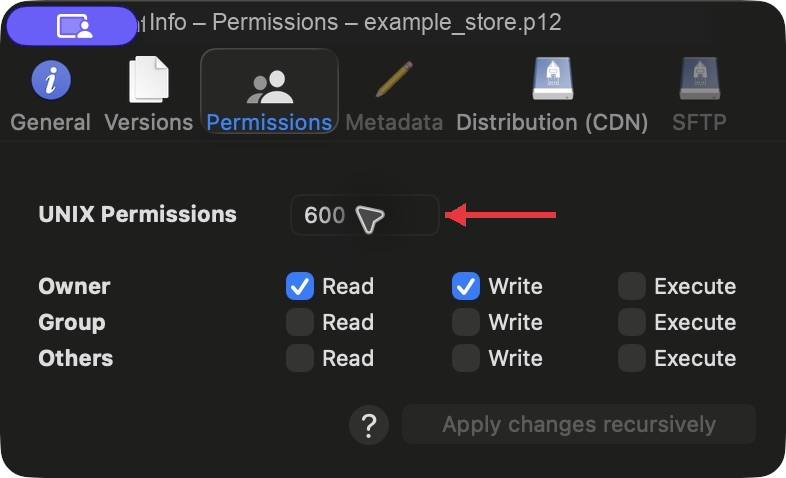
    Enter 600 and press Tab. Close and reopen Info to check that 600 remains.

    Do not upload the certificate to the WordPress Media Library.
    Cyberduck certificate permissions set to 600. Only the owner has read and write permission. The filename is fictional.Enlarge screenshot
    600 is for the .p12 file. The folder uses 700.

    Step 8.8: Set file permissions

    Cyberduck certificate permissions set to 600. Only the owner has read and write permission. The filename is fictional.

    600 is for the .p12 file. The folder uses 700.

  9. 9

    Use your uploaded .p12 file

    WordPress adminwordpress.com/log-in
    WooCommerce → Settings → Payments → Visa Acceptance Solutions → Manage

    Your .p12 is already uploaded. Fill in these fields in WordPress.

    Production configuration example in the real WooCommerce form. Arrows mark Production, live credential fields and protected certificate details. Fictional example values replace private credentials.Enlarge screenshot
    Use your own filename and the password chosen when downloading the .p12. Examples shown.

    Step 9: Use your uploaded .p12 file

    Production configuration example in the real WooCommerce form. Arrows mark Production, live credential fields and protected certificate details. Fictional example values replace private credentials.

    Use your own filename and the password chosen when downloading the .p12. Examples shown.

    Key File Path
    Use this path with your own .p12 filename:/srv/htdocs/wp-content/.certificates/example_store.p12
    Key Password
    The password you chose for the .p12, not your WordPress or SFTP password.

    Turn on Enable Response MLE, then continue.

  10. 10

    Choose payment options and save

    WordPress adminwordpress.com/log-in
    Visa Acceptance Solutions → Save changes
    1. Enable the gateway. Choose Embedded or Sidebar for the checkout display.
    2. Check collection settings. Use the Charge Virtual-Only Orders and Capture Paid Orders settings confirmed by Trolleys.
    3. Save changes. Leave Debug Mode Off and fraud protection on. Check for a success message and Registered Webhooks.

    If saving fails or the expected webhook entry is missing, contact Trolleys before accepting orders.

    Complete Production configuration example with arrows marking Enable the gateway and Save changes. Credential fields contain fictional example values.Enlarge screenshot
    Enable the gateway and select Save changes at the bottom.

    Step 10: Choose payment options and save

    Complete Production configuration example with arrows marking Enable the gateway and Save changes. Credential fields contain fictional example values.

    Enable the gateway and select Save changes at the bottom.

  11. Check a payment and refund

    11

    Place one small live order

    Your online storewordpress.com/sites
    Your storefront → Cart → Checkout
    1. Add a low value item to your cart. Arrange this payment check with Trolleys first.
    2. Pay with your own card. Enter your details and complete any bank verification. Pay once; wait for Order received.

    This makes a real charge and may incur fees. Never use sandbox card numbers in Production.

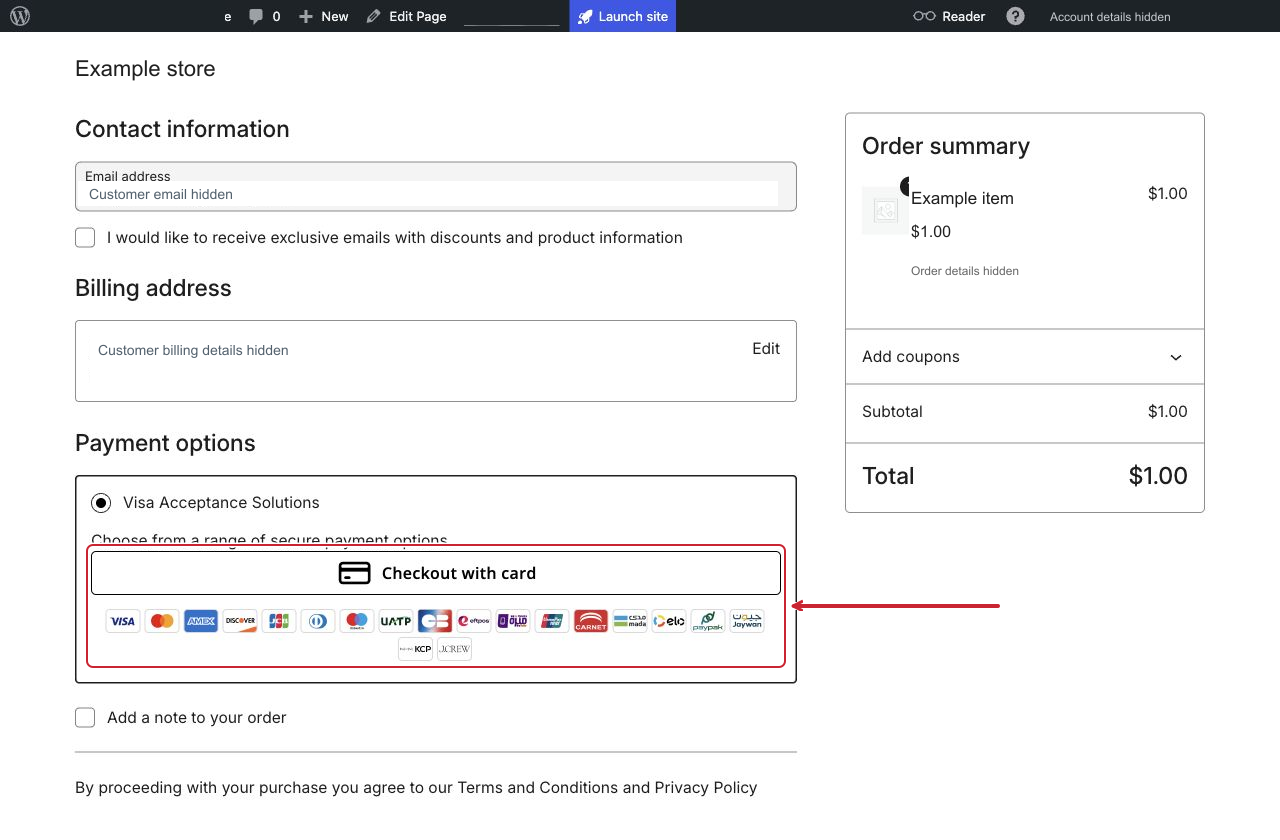
    Example checkout in the real WooCommerce interface. An arrow points to Checkout with card. Personal and product details are replaced with example labels.Enlarge screenshot
    The WooCommerce payment interface. Your store theme may differ.

    Step 11: Place one small live order

    Example checkout in the real WooCommerce interface. An arrow points to Checkout with card. Personal and product details are replaced with example labels.

    The WooCommerce payment interface. Your store theme may differ.

  12. 12

    Check the payment in both accounts

    WordPress adminwordpress.com/log-in
    Cybersource Business Centerubc.cybersource.com
    WooCommerce Orders → Order notes · Business Center Transactions
    1. Open WooCommerce → Orders. Open the new order. Find its payment reference in Order notes.
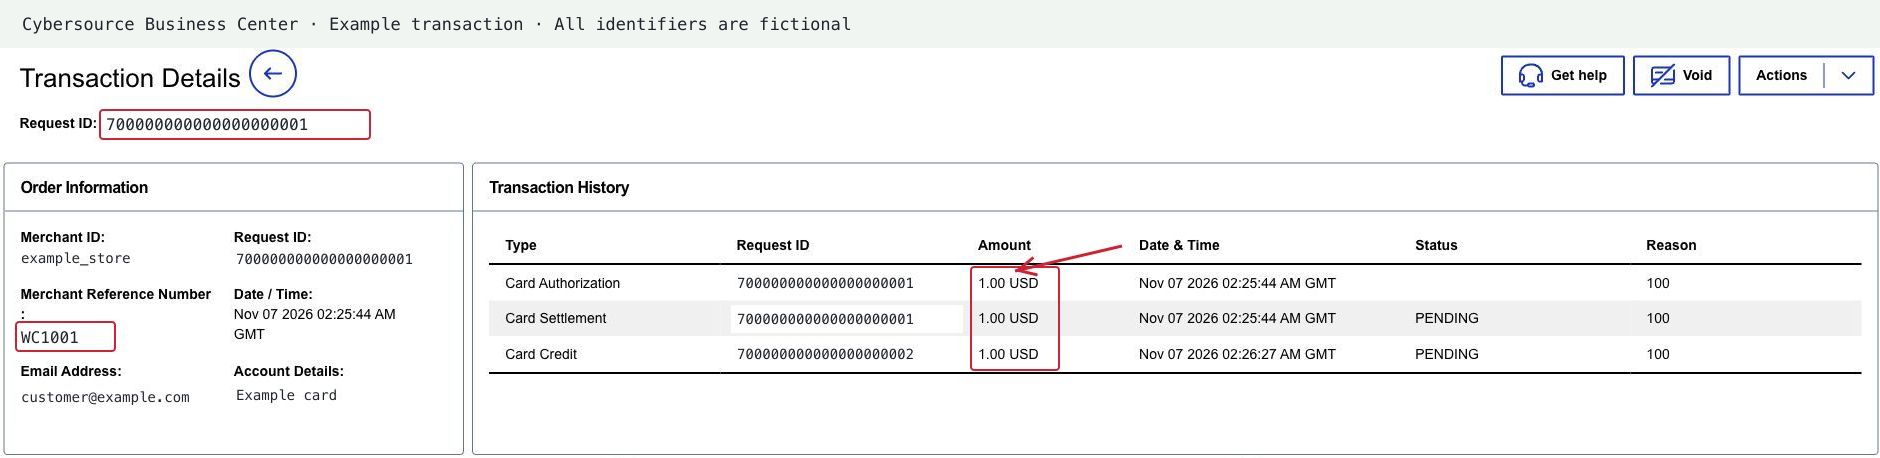
    2. Open Cybersource → Transaction Management → Transactions. Find the Request ID. Match the order reference, amount and currency.

    Authorization is approval, not collection. Pending is not complete. If records disagree, contact Trolleys before taking more orders.

    Business Center transaction example with arrows marking the Request ID, merchant reference and amount. Identifiers are replaced with fictional values.Enlarge screenshot
    Match the boxed reference and amount. Card Credit appears after a refund.

    Step 12: Check the payment in both accounts

    Business Center transaction example with arrows marking the Request ID, merchant reference and amount. Identifiers are replaced with fictional values.

    Match the boxed reference and amount. Card Credit appears after a refund.

  13. 13

    Verify the refund

    WordPress adminwordpress.com/log-in
    Cybersource Business Centerubc.cybersource.com
    WooCommerce Orders → Refund · Business Center Transactions
    1. Refund the captured payment. Open the WooCommerce order. Select Refund, enter the amount, then Refund via Visa Acceptance Solutions.
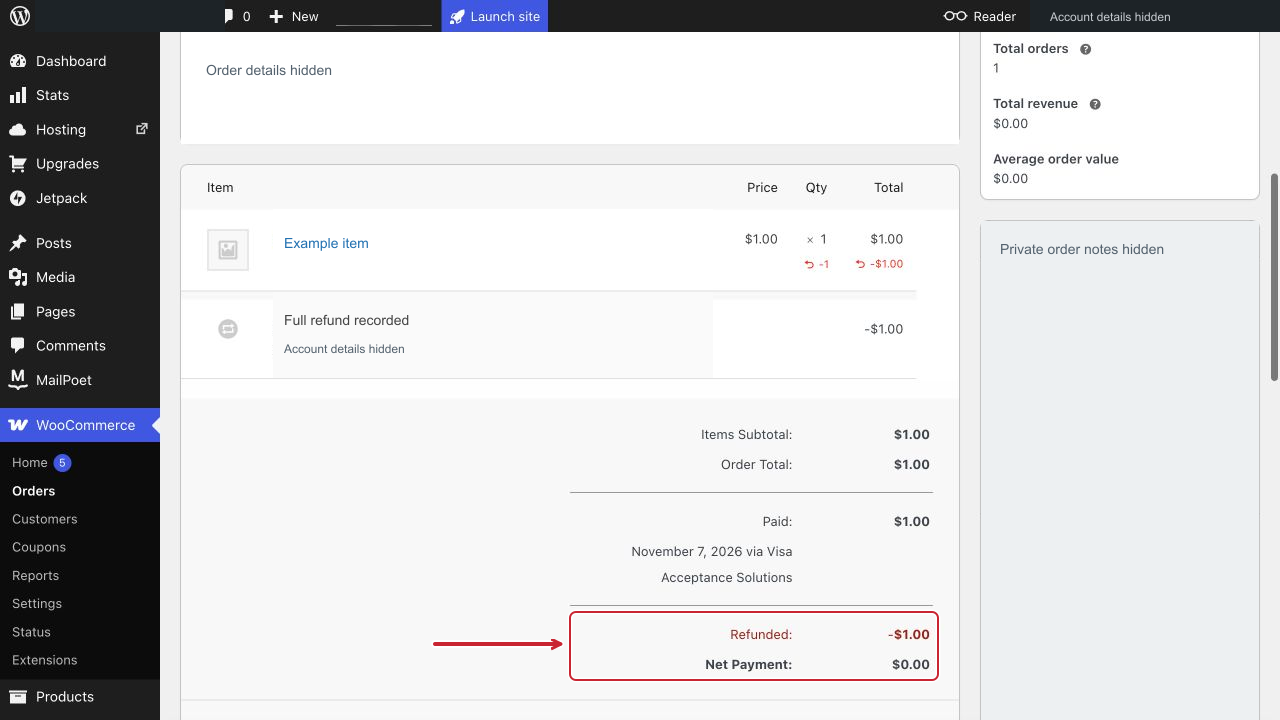
    2. Check both accounts. For a full refund, WooCommerce shows Refunded and zero Net Payment. Find the matching credit in Cybersource Transactions.

    For an authorization only, ask Trolleys about a reversal. A manual refund does not return money through the gateway. Bank posting may take longer.

    WooCommerce order screen with a red arrow highlighting one dollar refunded and zero net payment. Private order details are hidden.Enlarge screenshot
    A full refund shows the refunded amount and zero Net Payment.

    Step 13: Verify the refund

    WooCommerce order screen with a red arrow highlighting one dollar refunded and zero net payment. Private order details are hidden.

    A full refund shows the refunded amount and zero Net Payment.